
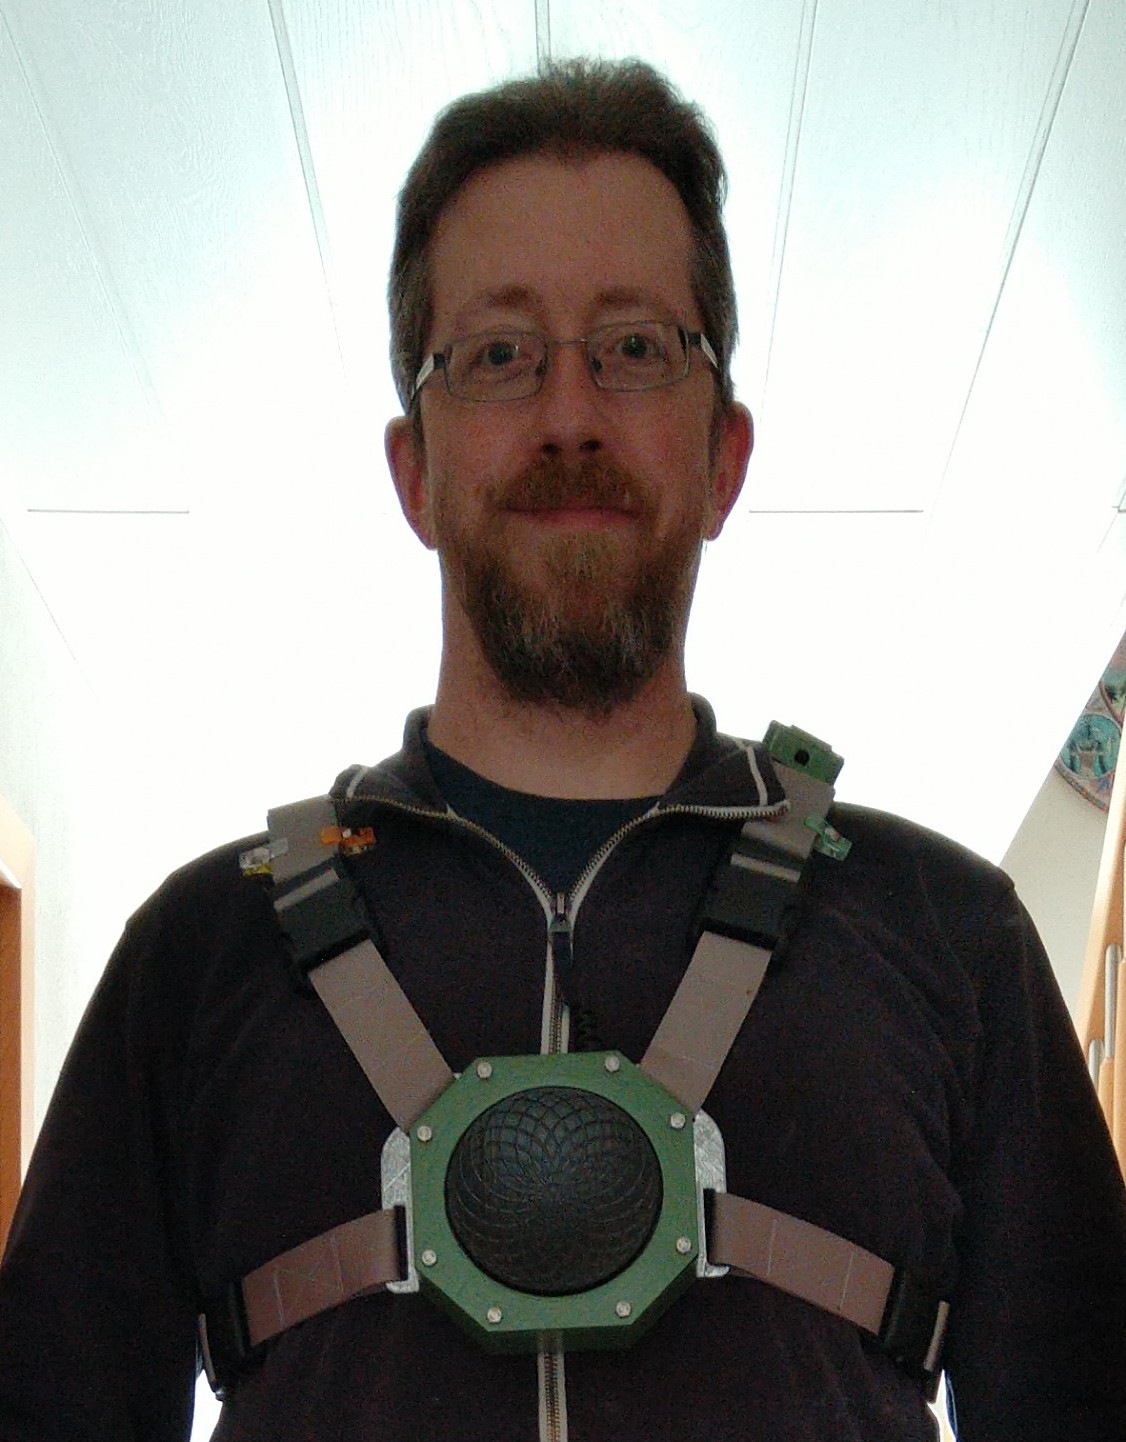
I enjoy the game Control. For me, it has the right mix of mystery, intrigue, and difficulty, which is to say it is not too hard. And it has some items that I “want to have” in terms of dust catchers around the house. I have already printed the service gun, although I have yet to paint it. But after getting to know the device a little more, I feel I want to make an HRA – a Hedron Resonance Amplifier.
I will not get into what a Hedron Resonance Amplifier is, nor will I talk any more about the game because I would not want to get spoilers from an article about making things either. This is not about anything you need or should do in the game. This is merely me write down what I did in order to make my own HRA – as opposed to the Make AI Reality series – in the hopes that it inspires you.
3D-Printing
These days, you can print anything (but maybe not everything). In some cases, possible print options will come up during the image search already. And don’t get me wrong, I love 3d printing and use it myself often – because I own a printer and can keep it working (which is a more important skill than you would think). But printing alone won’t get you there.
In case of the HRA, I found these Hedron Resonance Amplifier 3D Files on Etsy which looks quite reasonable as well as nice. The thing to keep in mind, though, is that you still need to finish and paint everything that comes off the printer, even if you happen to have the right color of filament on hand. Plus you need additional pieces like the belts or the cable that you cannot print, anyway.
Getting References
So despite the printed files you need to know what the finished product needs to look like. The easiest way to do that is to perform an image search in your favorite search engine. This will yield promo material and screenshots, hopefully with a variety of angles that give you details beyond the mere 3D models.
A second option would be to take your own screenshots – if you have the game on hand. There are different ways to do that, and I will not get into those. But in the case of Control, there are enough NPCs standing around rocking HRAs – even different versions – and it should be easy to get a set of reference material from every angle. For reference, I will be making the “civilian” version, not the more belty one worn by soldiers and guards.
Side Note: PureRef
When it comes to managing and arranging visual resources, I found that PureRef (not sponsored) is a very cool solution. It basically functions as a window through which you can access a huge canvas. Drop your reference material into there, scale and transform it, and even sort it into groups or piles like you would on a corkboard.
I have been using it myself for several projects now, and I like the ability to arrange screenshots in whatever way you see fit, and then move the one you need right now into view without taking up more of the screen than strictly necessary. Best of all, PureRef is free, so give it a try!
The Two Boxes
These parts are pretty easy to print, and require very little in terms of supports. If you have filament on hand that matches the desired colors then go ahead and use that, but frankly, the filament color will not see the light of day once the paint job is done.
I had to open up the through holes a little bit, and widened the connecting holes with a bit just a little smaller than the thread diameter. This allows me to use the screws the way they are intended. I did not have the right screwheads, but thanks to standardised threads, I can replace them later.
The Black Rock
The round plate, which is apparently made of a substance called “black rock”, can theoretically be made in any number of ways. Of course, 3D printing is the easiest to recreate the intricate surface shape and pattern. As for alternatives, you could use a round piece of plywood or plastic to recreate the black rock and get away with it. Upon closer inspection, the plate does have a slight bowl to it, which you could recreate using a lathe or aggressive sanding. The actual subdued ring pattern is harder to produce without a CNC – or, again, 3D printing.
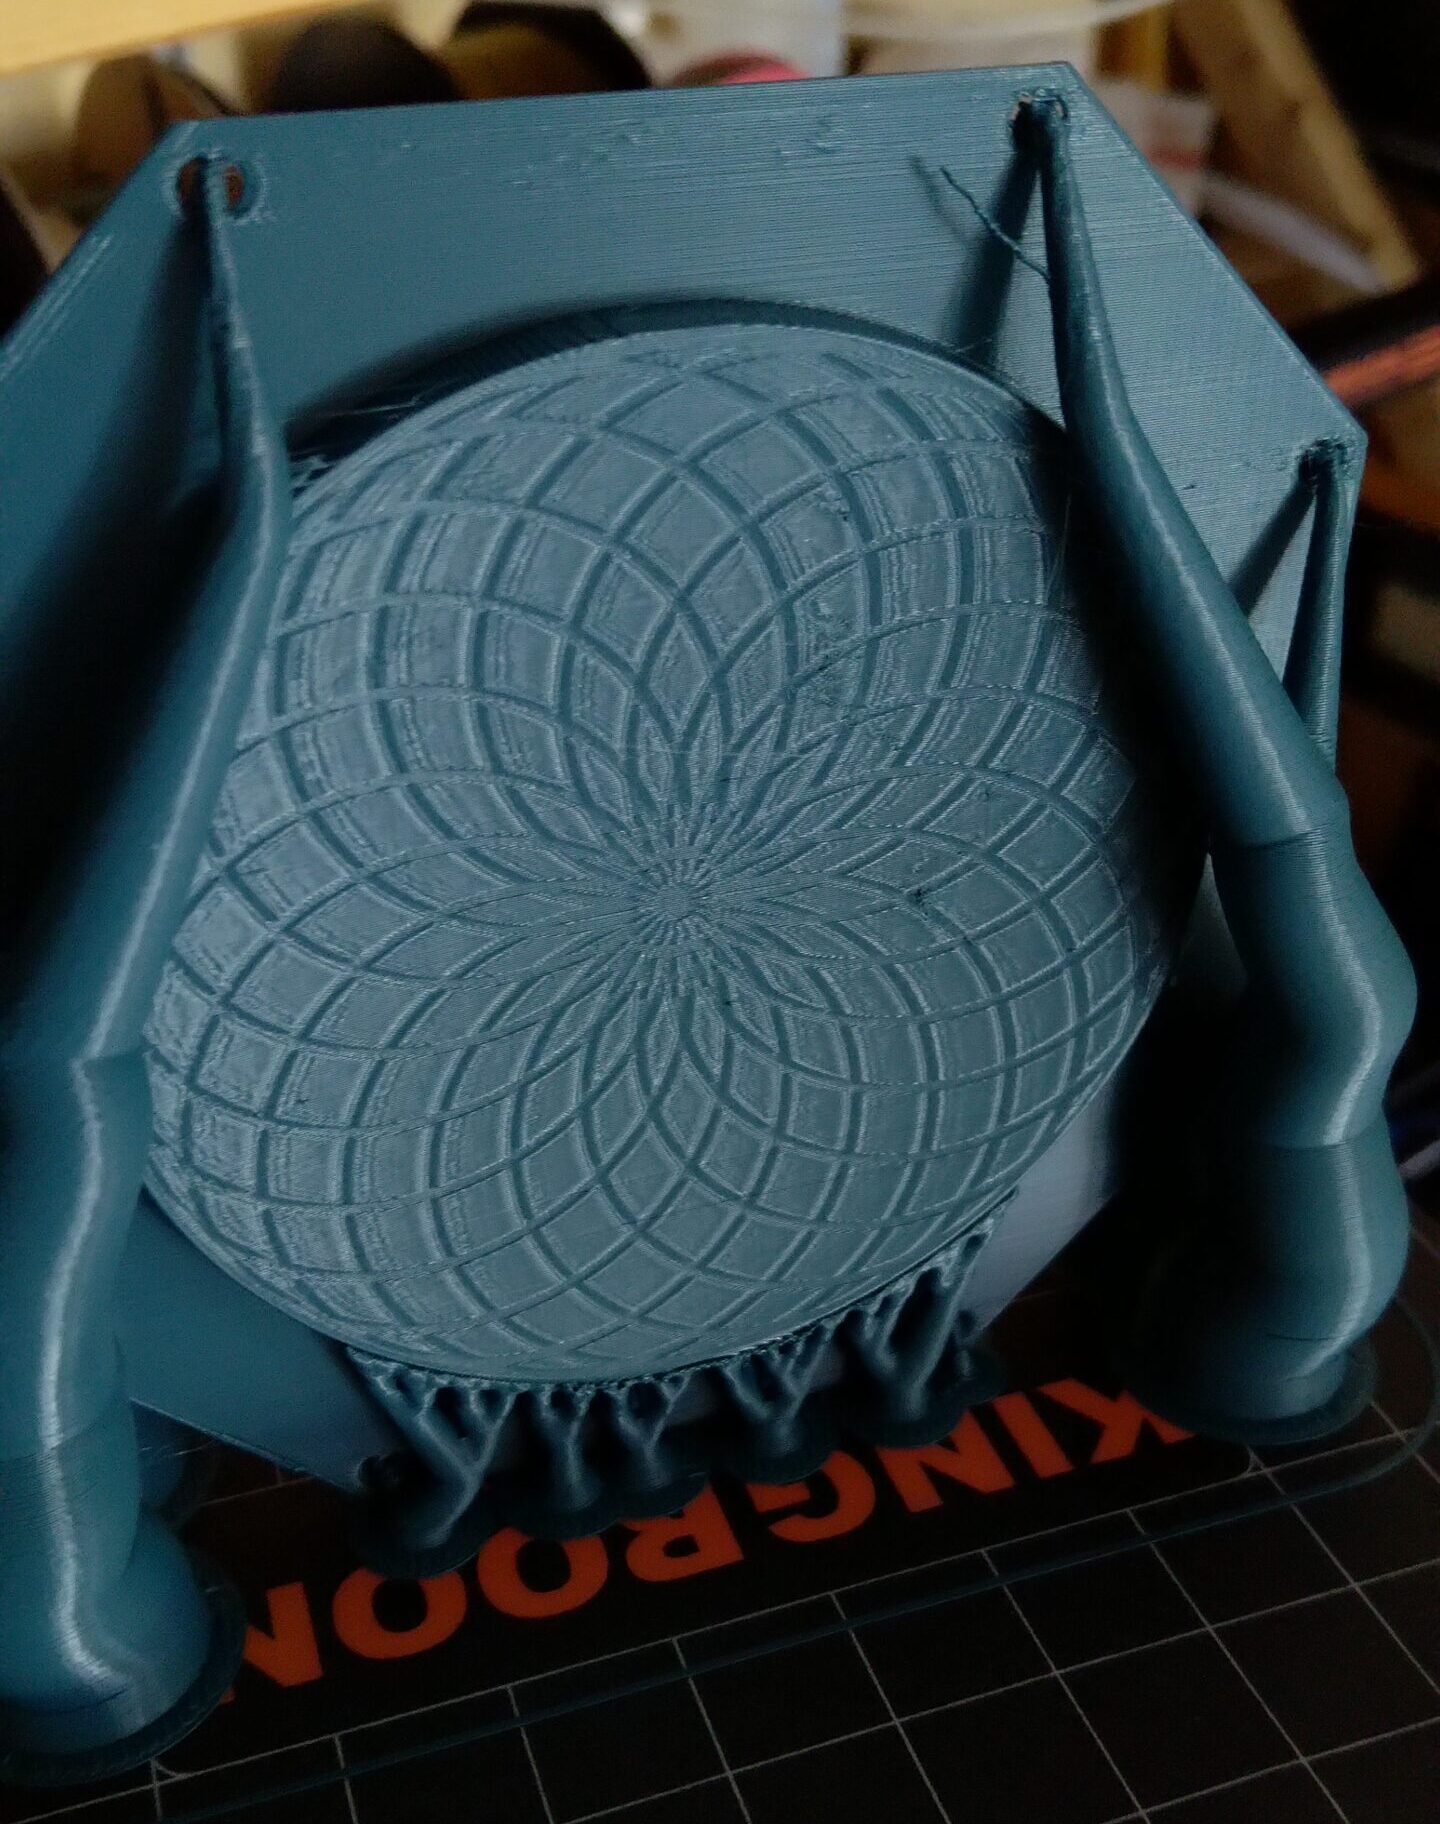
Frankly, the only reason not to 3D print this is because you have something in mind that mimics stone better than plastic can. There are even some compounds out there that could be cast and made to look like stone*. But keep in mind, that plastic is pretty versatile and sturdy, will not crack, and is not too heavy.
The Belts
For some reason, I did not realize straight away that the straps were grey rather than standard seat belt black. That is why I thought I had an unfair advantage on this one – the inclination (and ability) to hoard stuff that might come in handy at some point. Which includes some old seat belts. They would come in handy for the HRA if you are willing to accept the lack of fidelity.
I went ahead and ordered some grey belt (5 meters were just about enough), because I think it adds a lot to the look. What I did find in my cache were two pairs of two black clasps for exactly that width of belt each, and while I need to get rid of a brand logo on one pair, I feel very vindicated for having held on to them all this time. I might have a problem.

The pattern of belts is pretty straight forward. All you need to do is to sew them in place where needed – you can even see some of the seams on the model in game. I used clothclampthingies (or quilting clips)* to test the belt set-up. This allows me to try out different configurations, and helped me avoid some issues when I placed the clasps the wrong way. The side that allows for length adjustments in the belt needs to face away from the HRA.
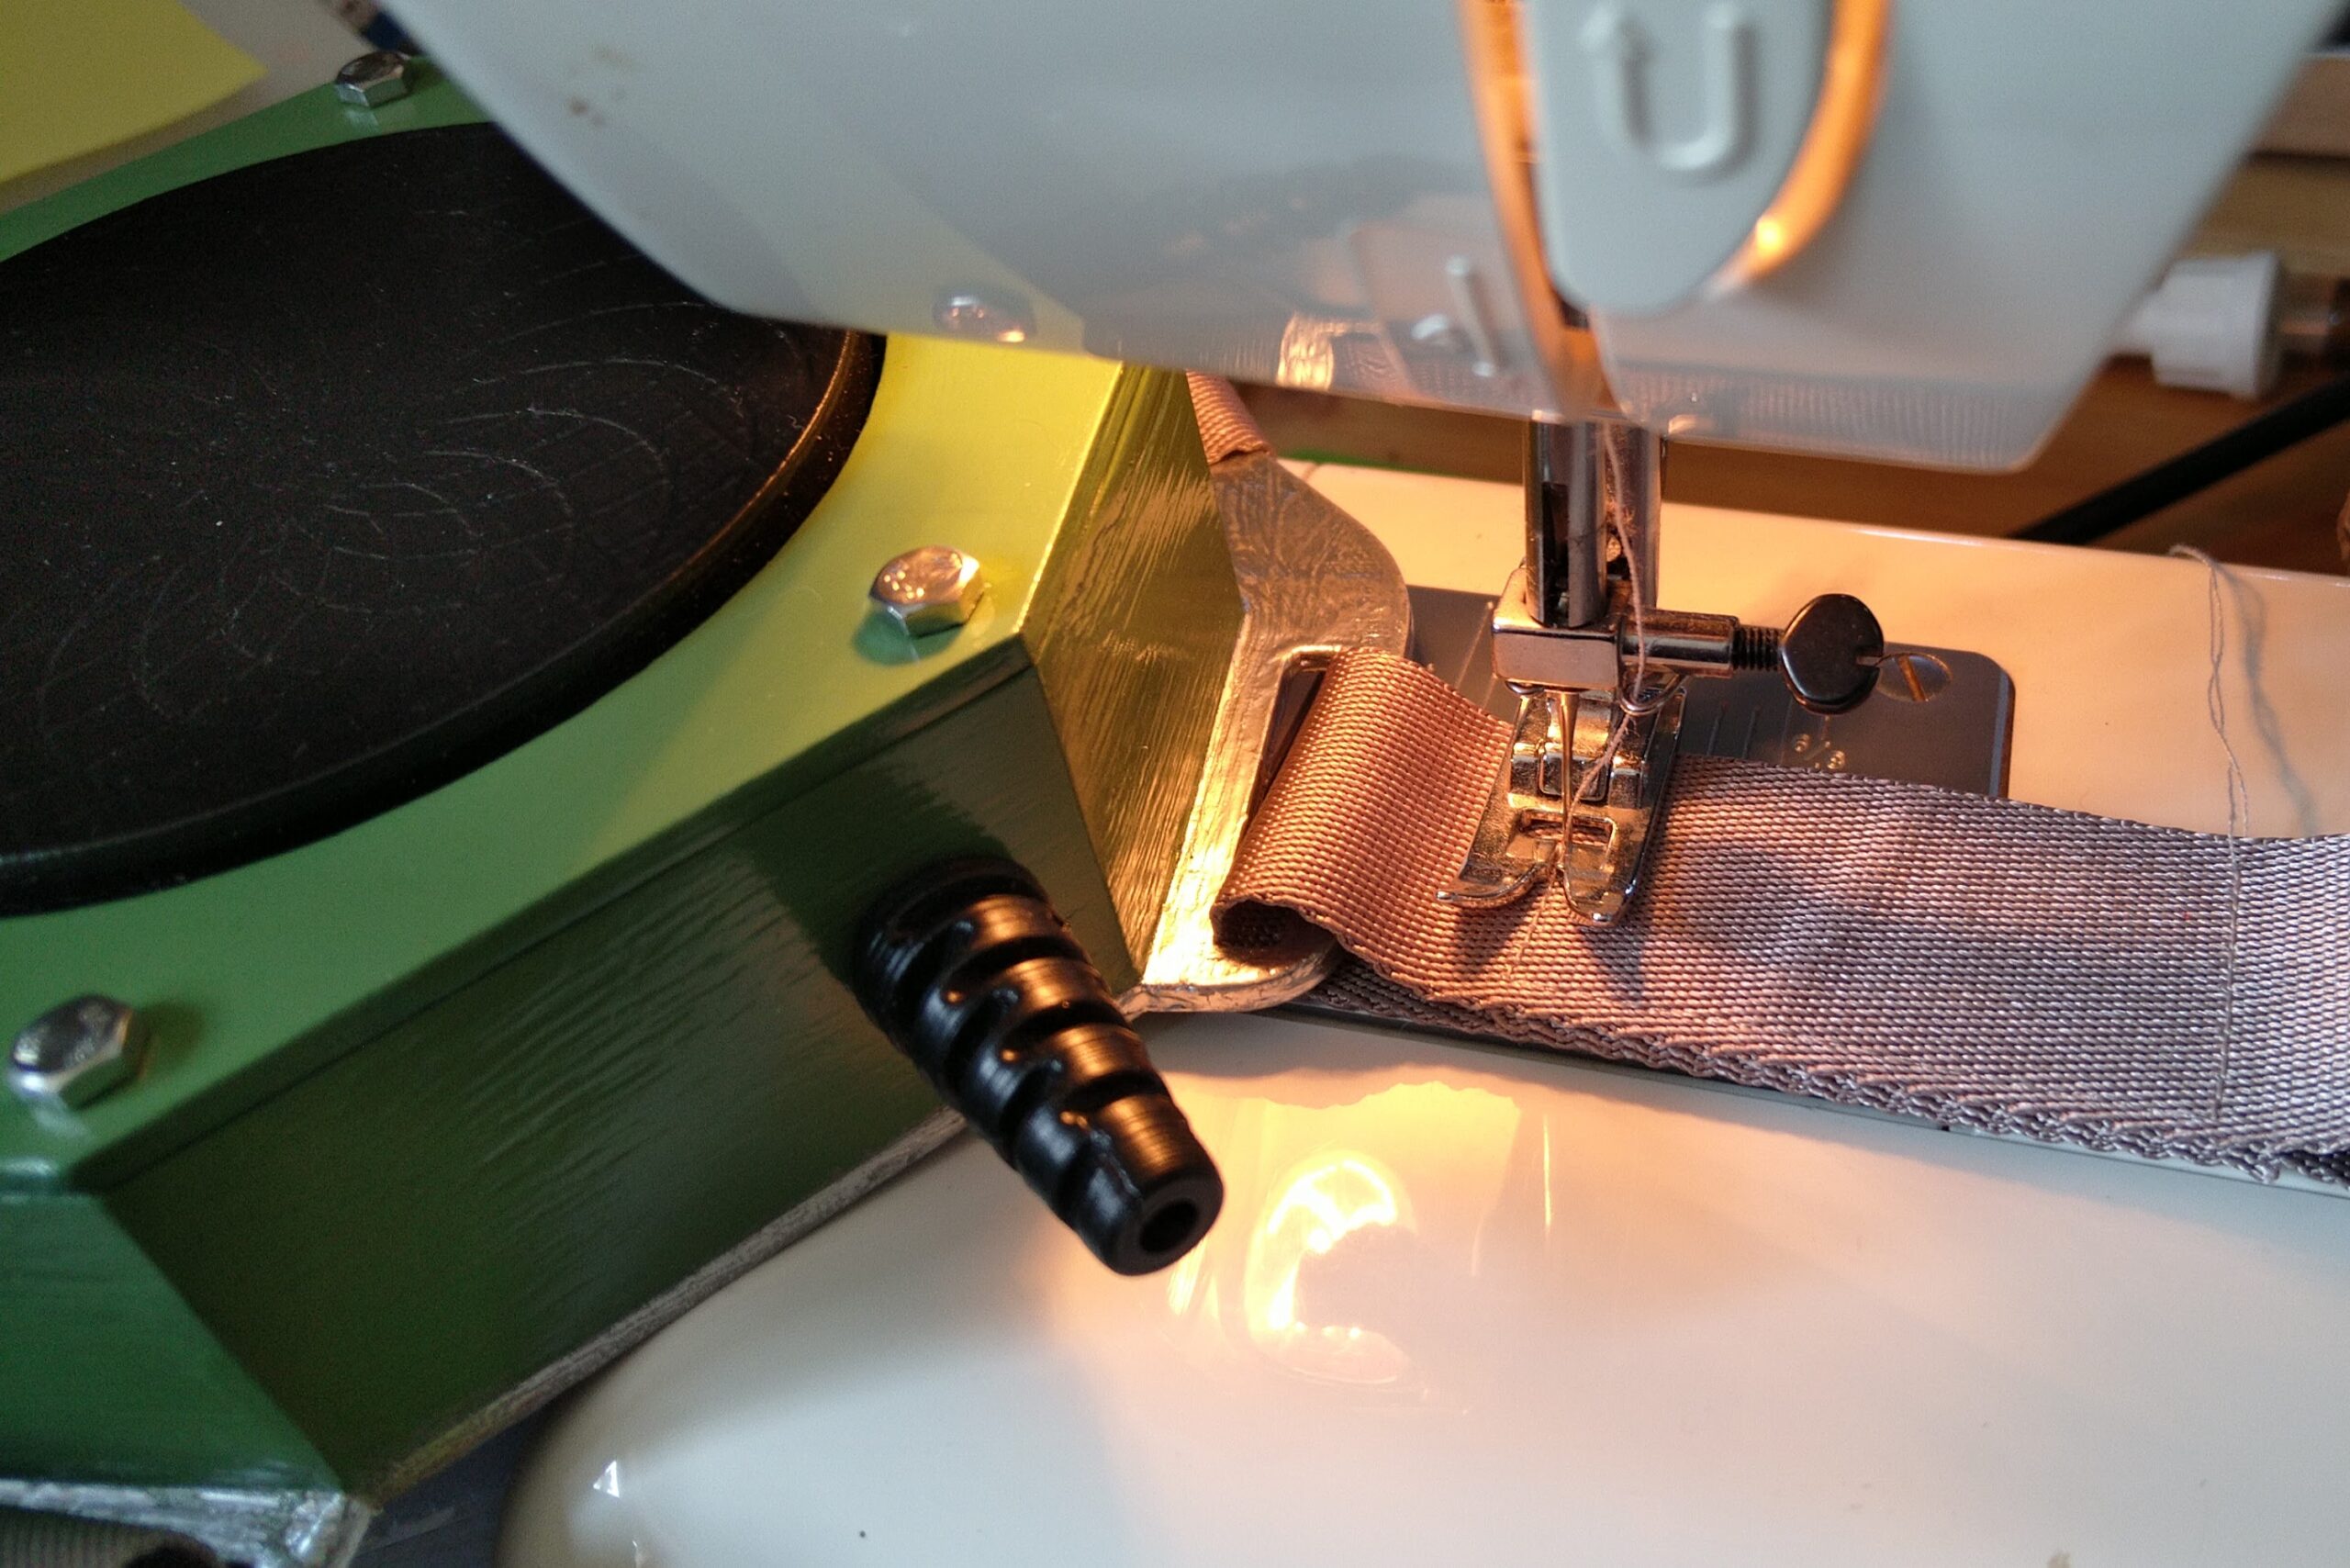
The best way to make that pattern permanent is a sewing machine*, but needle and patience can go a long way, too. Since it likely won’t see much strain, either, you could probably get away with gluing the belt in place, but I would caution against it. It would be messy and hard to make look “clean”. In addition to that, you can easily remove a seam if necessary. Glue? Not so much.
The Logo on the Back
This is where the four belts come together behind your back – hopefully not conspiring against you. It only occurred to me when setting up the belt that this does not need to be a functional piece at all. You can wrap the shoulder belt around the chest belt easily, thus not requiring this back part to do any belt managing.
Yes. I wrote that, than I saw the screenshot below when looking what should go on the back piece. The chest belt does not go straight across the back, but the four belts indeed meet higher up, between the shoulder blades, obscured by the back patch. I have decided to opt for the Langston-approach and wear a jacket whenever I don the HRA. Most of the time, it’ll rest on a display anyway.
If you still want to go for the complete look, the back cover needs the letters FBC (for Federal Bureau of Control) emblazoned on it in clear font. The first method that comes to mind would be stitching, but that does not sound like an aesthetic this institution would vibe with. I think a good option would be to use vinyl heat transfer sheets* – cut them out and iron them onto the back. Alternatively, you could cut out a stencil and use white spray paint on black cloth.
The Extras
Just like the devil, the good looks of a prop are in the details. Both boxes need to be connected by a red cable, which has a strain relief on the main box end. This can be salvaged from an old device (the best-looking option) or, again, 3D printed (possibly the quickest).
The small box features an LED which pokes through a hole. You can plop it in and leave as is, or you can add a small battery and make it light up, making use of the box’s other feature, a switch. The yellow cap – again most easily printed – invokes feelings of a rotary switch, and could double as a button for the LED.
My Paint Process
To get rid of those layer lines, I have tried many things – including sanding, which I am not a fan of. My go-to solution these days is tinting paint, and I actually developed it on this project. To avoid issues with translation, this is paint that comes in several colors and comparatively large bottles.
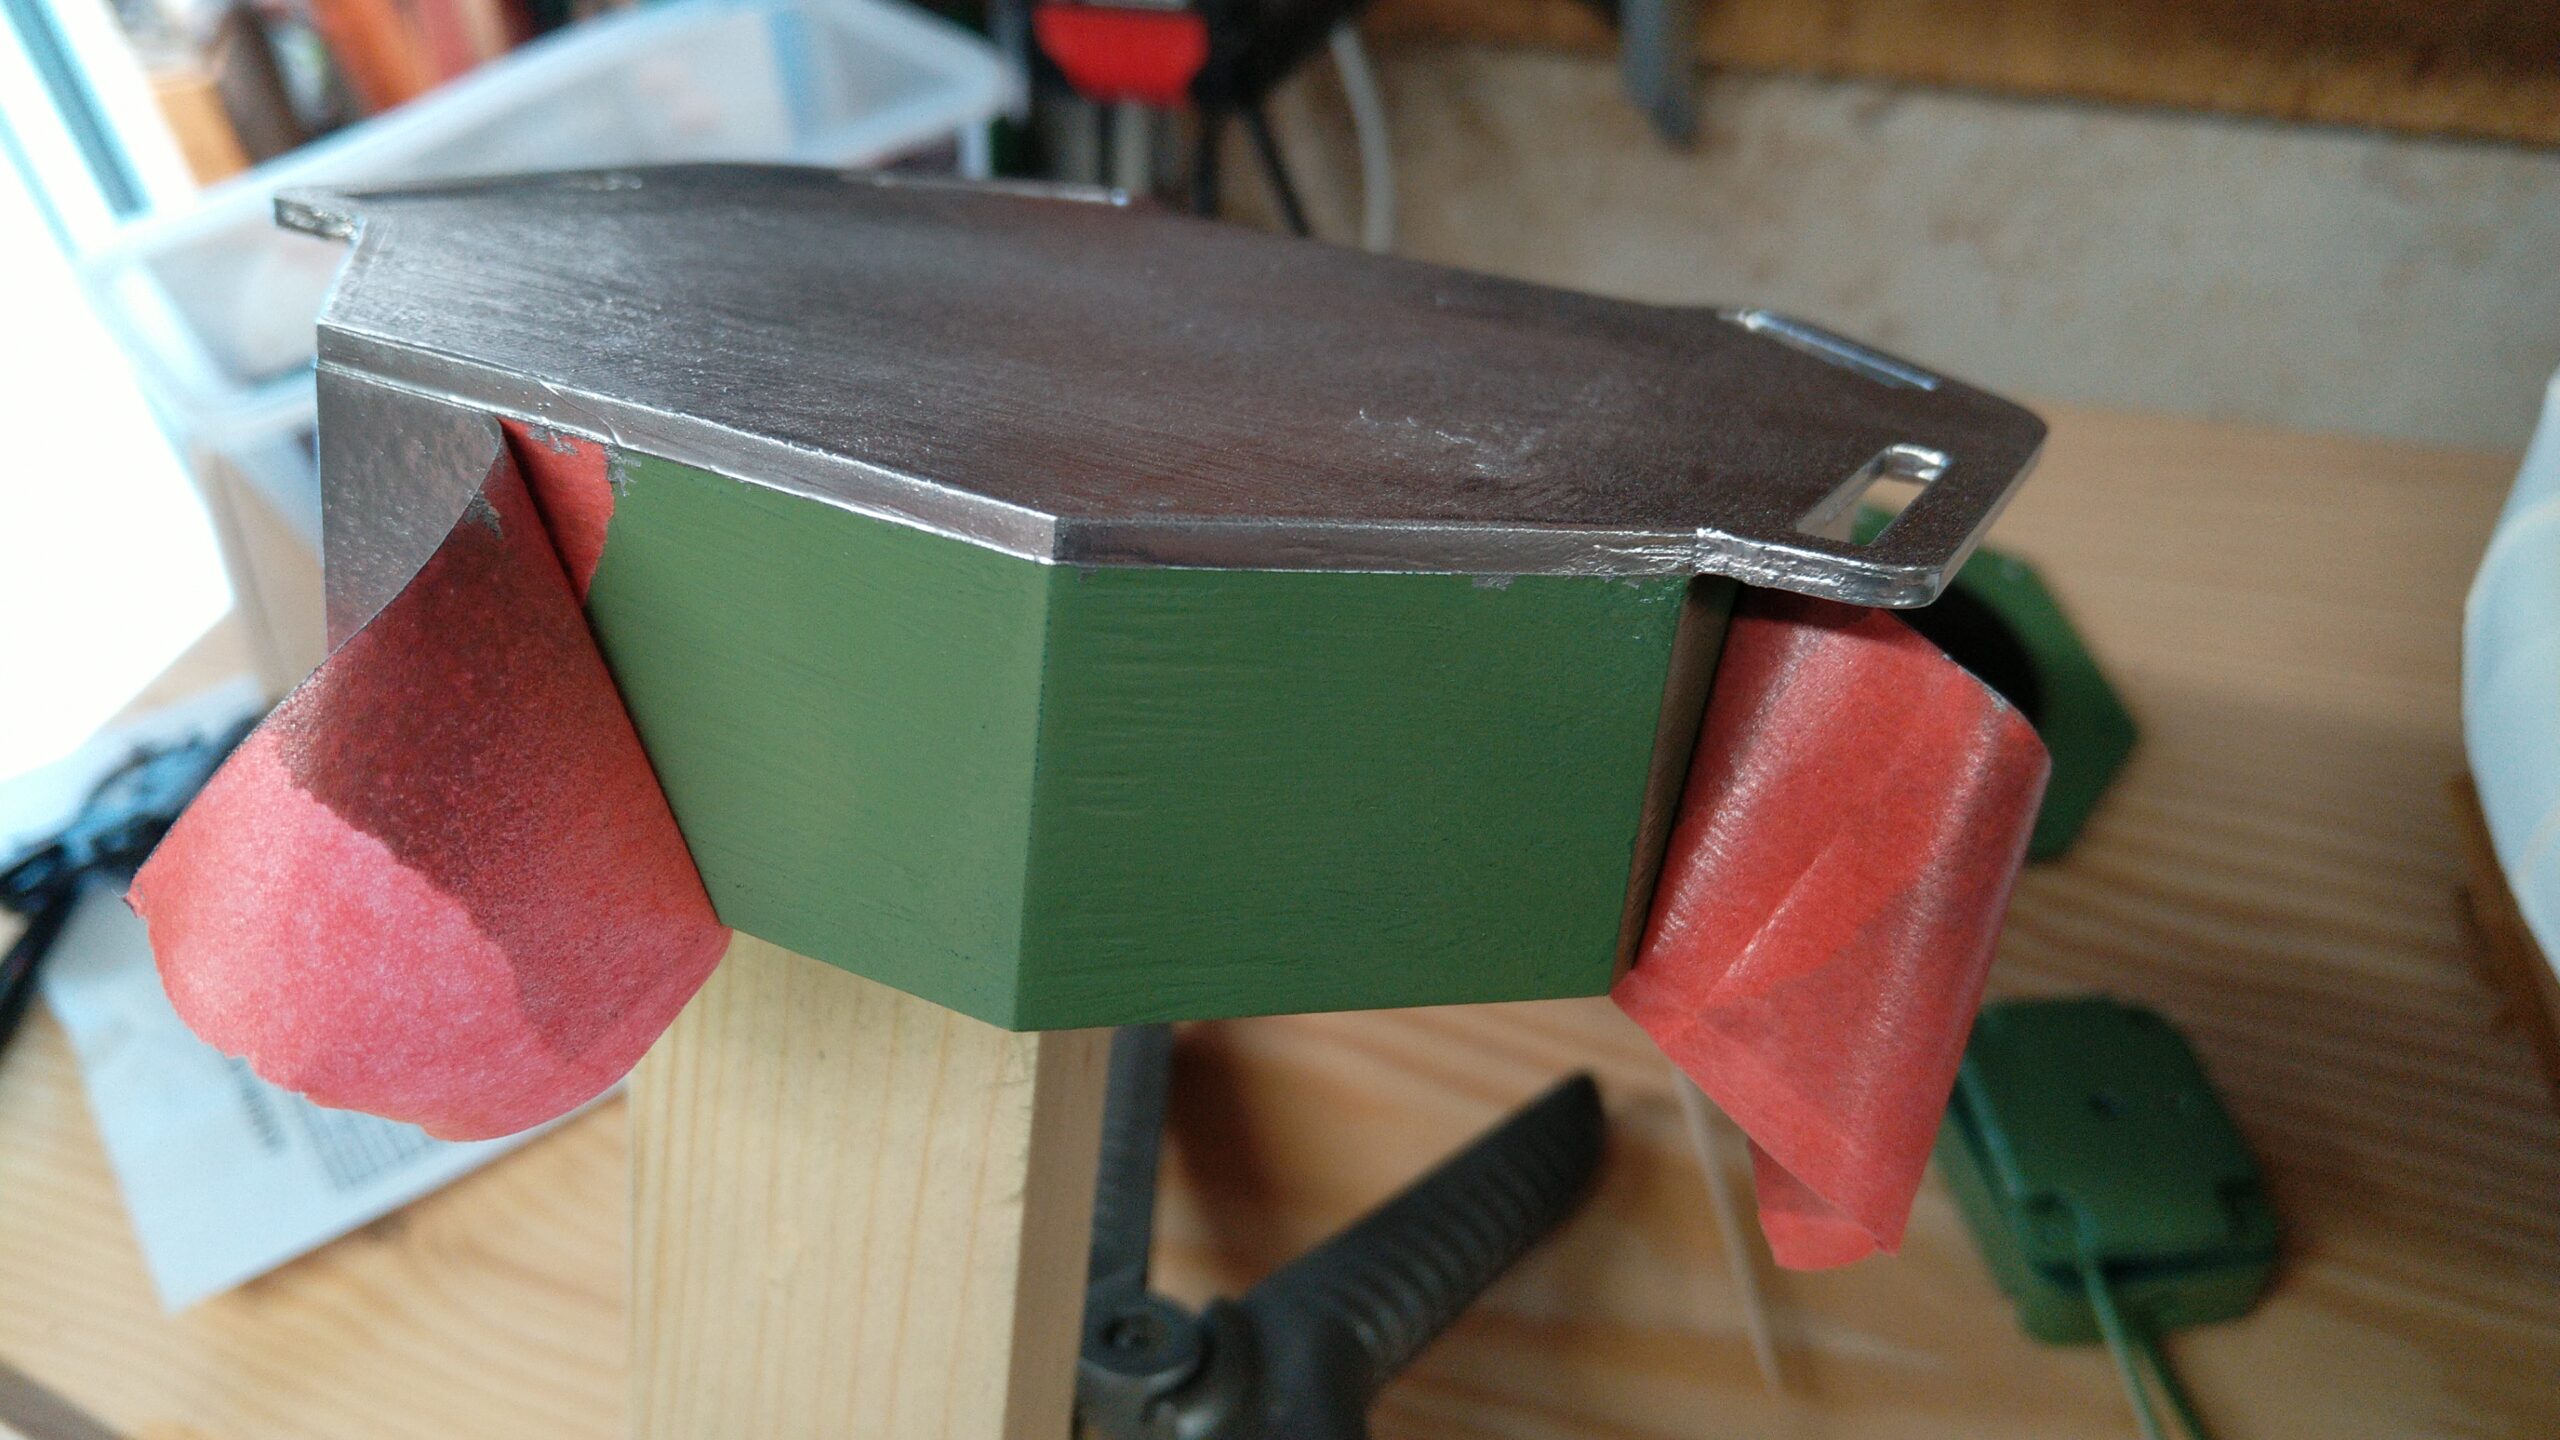
I started out with a couple coats of white to even things out. Once they had dried thoroughly, I sanded the flat faces using 240 grit sanding mesh* (sandpaper works just as well). That in itself produces a very flat surface without much dreaded sanding, because you do not need to sand away much filament at all. Then, I picked a color that matched what I needed best. It does not have to be exact – for the green parts of the HRA the paint I picked was closer to a dark forest green, and those to be silver I left white.
Once there are sufficient layers of color (usually 2-3) on there, I gently sanded again to smooth the paint out. The next step does require spray paint in a color that fits within your personal degree of fidelity. I used the closest green I could find at my local hardware store, and it works well enough for my personal taste.
Painting Split Parts
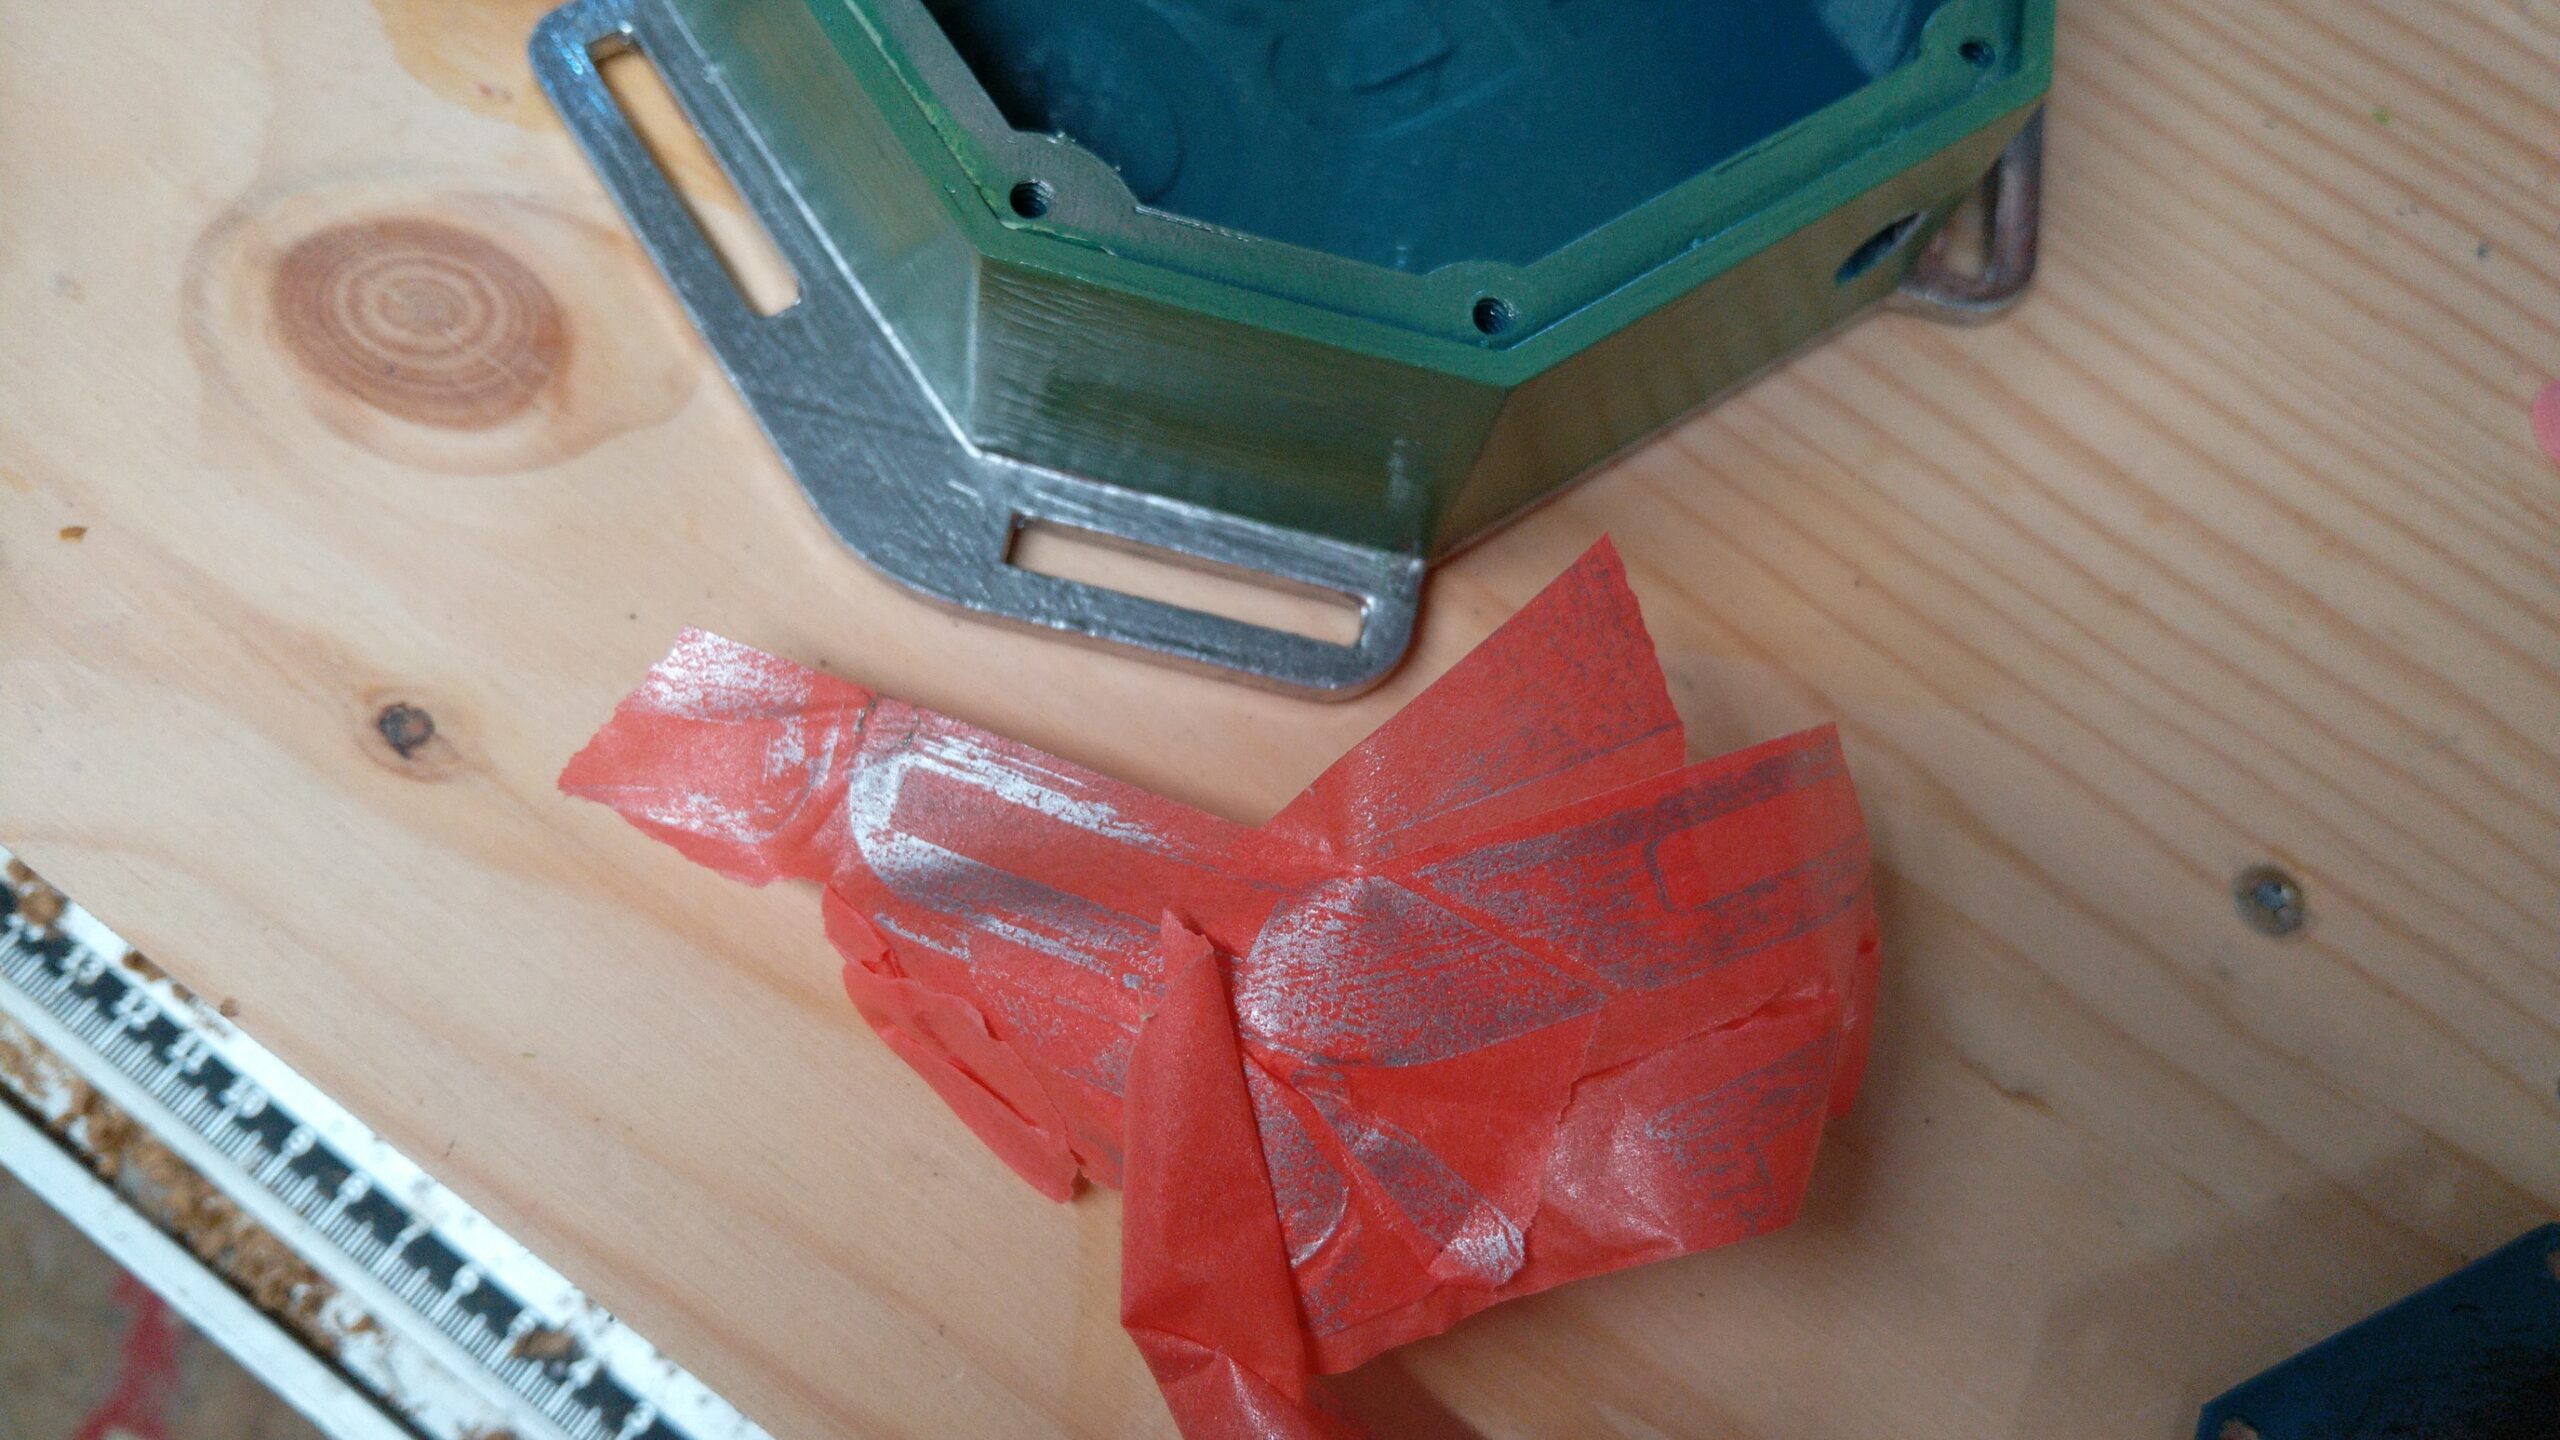
There was a caveat to this process for the main body of the HRA – it consists of two different colors. Since I wanted a spray paint finish as opposed to a brushed look, I used painter’s tape* to mask off the metal parts before spraying the rest military green. That worked out well.
Once the paint had dried thoroughly, I removed the tape and instead taped off the green bits. Then I used metal effect spray paint on the yet white parts, and that worked out well, too. After removing the tape from the green, the whole thing looked very much the part, except for two spots where the metallic has seeped under the tape.
To fix that, I taped off the metal again and added some more green, which was no big deal in itself. The only (slight) issue occurred when I removed the tape. It took some of the silver paint job with it. I got lucky again since it did not take enough to make a difference, but I was still surprised that something designed not to harm paint still did. But then again, maybe I had not given the paint enough time to thoroughly harden.
Finishing Touches
As far as I can tell, the HRAs have not seen much use in everyday Bureau live up to the events of the game. Thus, you probably do not have to go overboard with aging and such. If you want to go for it, add some “battle damage” type of finish, with dents and gauges as opposed to rust and worn down edges, matter splatter and burnt spots over wear and tear on the belts. But most likely, you do not need either for it to look good.
The Vibe (Optional Idea)
If you are willing to go that proverbial extra mile (a distance I am sure the Oldest House would gladly provide for you), here is an idea to make this item a little more interesting. I have decided not to try it at this point, because I am not planning on wearing my HRA a lot – there has not been an incursion near me in a while. But I think this HRA 2.0 should not be too hard to pull off.
The HRA is about resonance. So maybe it vibrates ever so slightly? My idea is to add a small motor with an off-center weight, which would cause it to shake quite a bit when spun up. Add to that a micro controller that regulates the amount of spin at random. It would vary the amount of vibration, and turn it off every now and then to give you time to forget it was ever there, before reminding you that there is something out there trying to invade your mind. At least that is the idea.
In my head, I am including a battery (possibly an 18650) to the main box and using the red wire to the small box to connect this to the button there.
Will the HRA save us?
There are so many props I want to make and have. The HRA was one of those that skipped the line and went right ahead, but among those, it shines as something that actually worked out without long resting-and-thinking periods. Maybe my new spray booth played a role in that – I will do a video about it at some point.
If you enjoy Control and related content, there will be more in the (near) future. Until then, you should check out some of my other projects, or outright join me on Discord to chat!
Thanks for stopping by, and remember to Be Inspired!
Links marked with * are affiliate links. At no extra cost to you, they kick back a few cents to the channel.
Inspire your inbox!
Subscribe and never miss a project!
Thank you for subscribing!
Something went wrong...